
Inside: Get Colorful with Tinsel Hair Extensions.
The ’90s trend of tinsel in one’s hair is making a comeback. Hair tinsel isn’t just for the performers or individuals with super cute hair; anyone can benefit from it. Your teen probably shares my sentiment that “more is more” when it involves fashion.
Go wild and mix in some unique style, color, and fun to your hairstyle with some creative tinsel hair extensions! Not only will your teen love this tinsel look, but you may also even love it too!

Whether you want to match your hair color, or stand out from the crowd, you can find a color that works for you. There are a wide variety of styles, from the understated looks to the glitzed-out queen with a full mane of sparkles and glitter.
What Is Hair Tinsel?
Its function is to impart a subtle metallic sheen. It could just be a few strands of color, or you could add more for a more pronounced look. Slim strands of polyester fiber that behave just like real hair in terms of weight, ease of care, and styling options.

Our Favorite Color Bundles
- Holographic Hair Tinsel
- Rainbow Glitter Mixture
- Gold Hair Extension Tinsel
- Pink Sparkle Mix
- Colorful Variety Pack

How to Apply Tinsel Hair Extensions
You don’t have to be a hairstylist to put in your tinsel hair extensions. You can buy kits that give you detailed directions on how to add them yourself.
It will take some practice to feel like a pro, so don’t get too frustrated if you don’t get it perfect the first time. That’s completely normal!
Or, if you would rather schedule an appointment with your stylist, feel free. Either way, it’s worth it to add some subtle glam to your hair.
Directions
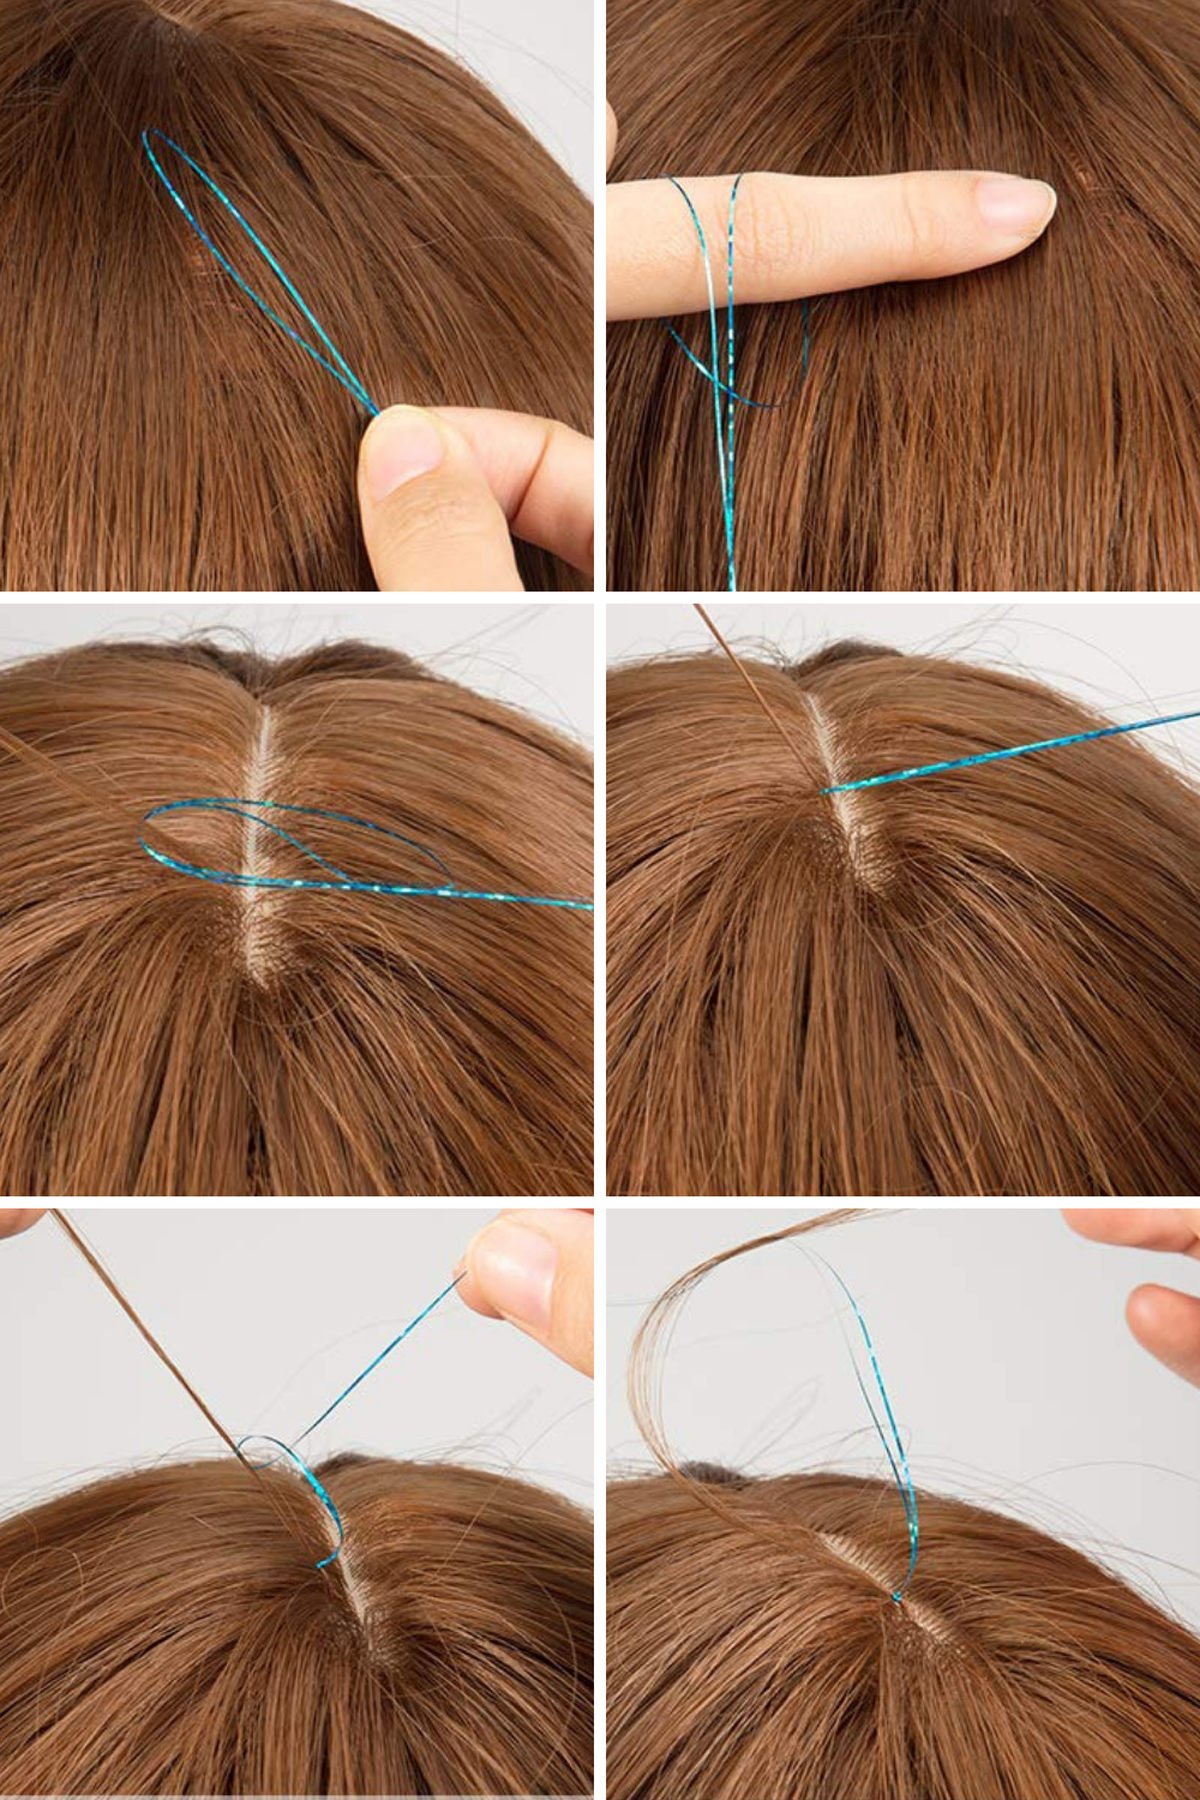
- Fold a piece of tinsel in half. Tinsel for your hair should be at least twice as long as your hair. After you fold it in half, bring the two ends of a single strand of tinsel together and fold it in half.
Note: You can cut down the tinsel if it’s too long for your hair.
- Use the looped end of the tinsel to tie a slip knot. With one hand, pinch the tinsel’s folded end to make a loop, and the other hand will complete the slip knot. Put your other hand’s thumb and index finger in the loop. Then, pinch the tinsel between your thumb and index finger and pull back to create a slip knot.
Note: Remove your fingers and pull the loop apart to see if you’ve successfully made a slip knot. Instead of becoming tighter and knottier, the loop should simply disappear.
- To secure the slip knot close to the scalp, thread two or three hairs through the loop. Make sure your thumb and index finger are still inside the slip knot’s loop. Separate two or three strands of hair near your part, and hold the slip knot above them with your free hand. Using your fingers, gently pull the hairs through the opening. Then, tighten the tinsel by pulling the ends closer to your scalp.
Note: Be sure to pull each hair strand through the loop completely to prevent knotting.

- Create a knot with the tinsel strands. Locating both ends of the tinsel is necessary for its continued use in your hair. Wrap the ends together and thread one of them through the loop you just made. Then, pull in opposite directions on the ends to tighten the knot at your scalp’s foundation. The tinsel will stay in your hair for about three weeks if you tie it in a knot.
- If you want to get rid of the tinsel, just slide the knot down your hair. The tinsel can be left in the hair for at least three weeks. The tinsel knot can be felt by running your fingers through your hair near your part. To untangle the knot, gently pinch it and work your way down the hair.
Expert Tips:
- Do your regular hair care routine, including washing, drying, and styling. The tinsel won’t melt or break and was made to blend in with your hair’s natural texture.
- Feel free to add as many strands as you would like to give your hair a bolder look.
